Written by Allan
Lines
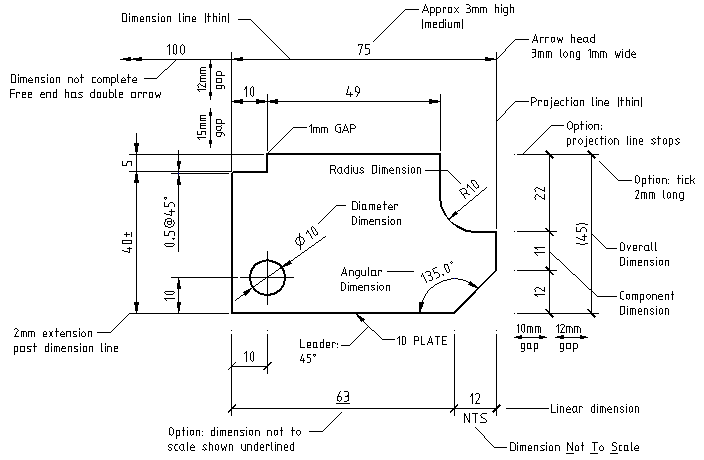
- Projection lines indicate extremities of a dimension. A gap of 1mm is generally drawn from the object to the start of the projection line. An extension of 2mm is generally drawn past the dimension line.
- Dimension lines run between the projection lines. They generally terminate with and arrowhead or tick. Arrowheads are usually 3x1mm and ticks, 2mm long.
- Thin linework should be used of dimension and projection lines.
- For dimensions that cannot be drawn to there true termination point, the free end is terminated in a double arrowhead.
- 15 x scale is the formula for working out the gap between dimension lines and the object.
Notation
- Dimensions are usually in millimetres (millimeters). Place a note in the title block stating “ALL DIMENSIONS IN mm” to avoid the need to specify “mm” after every number.
- Dimensions lest than 1 should lead with a “0” before the decimal point. Example: 0.5
- Angular dimensions are specified in decimal degrees, degrees and minutes or degrees minutes and seconds. Example: 10.5° – 10°30′ – 10°30’30”
- When specifying an overall dimension, one non-critical component dimension should be omitted. Where all component dimensions must be specified, and overall length should be specified as an auxiliary dimension.
- Auxiliary dimensions should be shown in brackets or noted “REFERENCE”.
- Dimensions that are not to scale are underlined or noted “NTS”.
- Where the “plus minus” symbol appears after a number, the number has been rounded of to the nearest whole number. Generally this is not required, unless in clears up why a dimension string does not close off.
Alignment
- There are two common methods of aligning notations, “Aligned” is the most common.
- Aligned: The notations (text and numbers) are parallel to the dimension line. Dimensions can always be readable either from the bottom or the right of the drawing.
- Unidirectional: All dimensions are written horizontally.
