Some old school – power user – tips and tricks for using AutoCAD software.

A long-right-click moves, copies or blocks
When objects are grip-selected, a long-right-click can move, copy or make a block these objects. Hold the right-mouse-button till the cursor changes to an arrow, then move the objects. On release copy, move or block can be selected from the context menu.
An ellipse made of approximated arcs
Set the PELLIPSE variable to 1. All ellipses you draw will be approximated and can be exploded into arcs.
Midpoint Snap with CAL
To snap to the mid point of any two points, (for example to get the center point of a square) use the online geometry calculator ‘CAL and enter the expression: (cur+cur)/2, then pick the two points you want to use. The command is transparent, so can be used in the middle of a LINE command for example:
LINE
Expression: (cur+cur)/2
Enter a point: _endp of
Enter a point:_endp of
Resuming LINE command.
You can also assign this command to a toolbar button by using the macro ‘cal;(cur+cur)/2;
Bare Minimum Keyboard Entries
Pay attention to the AutoCAD prompt. There are clues in every prompt that can save time. For example, look at the QDIM command:
Specify dimension line position, or [Continuous / Staggered / Baseline / Ordinate / Radius / Diameter / datumPoint / Edit / seTtings] :
Note the capitalization. These capital letters are the bare minimum to type in order for it to work. The entire word datumPoint does not need to be typed because the single letter “P” will do the job. Also note, it is not always the first letter of the word, that is the shortcut, and what is entered can be either upper or lower case.
Creating Polylines of a Closed Space in a Single Click
Creating polylines of any closed space with a single click – To create a polyline of a closed space, use the BPOLY command. This command works similar to the hatch command, but creates a polyline instead of hatch.
Entity Selection During Dimensioning
Linear dimensions return this prompt:
Specify first extension line origin or <select object>:
If ENTER is hit here, dimensions can be done by selecting an entity, instead of two points. If this option is executed on a line, the two end points of the line will be extension line 1 and 2 respectively.
Find the Centroid, Center of Gravity, or Center of Mass of an Odd Shape
With the creation of a REGION or a 3D SOLID, it is possible to find the C.O.G., with the MASSPROP command.
Hiding Part of a Block
The XCLIP command can be used on blocks, as well as xref’s. This can be very handy when part of a block requires hiding from view.
How to Disable Particular Commands
Internal commands can be disabled (or undefined). Use the _UNDEFINE and _REDEFINE command.
How to Make a Date Time Stamp
Use the RTEXT command to create a date and time stamp.
- At the command prompt, enter RTEXT.
- Enter D for Diesel.
- In the Edit RTEXT dialog box, enter the following line:
$(edtime, 0, MON DD”,” YYYY – H:MMam/pm)
Insert a Live Text List of the Xrefs in a Drawing
Use the RTEXT command and enter the Diesel expression:
$(xrefs,2)
When Xrefs are attached or detached, REGENALL on the drawing will update the list
Make Objects Invisible for Printing Only
To create objects invisible on the print out (unprintable) place them on layer DEFPOINTS. This layer is created automatically by dimensions, but can be created manually. Another way, in the LAYER dialog box, is to click off the printer icon.
Last Point Entered Variable
The last point entered is stored as a variable under the @ character. A handy use for this is explained below.
Command: BREAK
Select object:
Specify second break point or [First point]: f
Specify first break point: (click a point on a line)
Specify second break point: @
This is a one-click break.
Moved instead of copy, oh no!
This is the situation: You have copied a detail and begin working on it. After some time, you realize with horror, that you have moved the original detail instead of copying it. To fix this situation use Edit>Copy on the new detail. UNDO until you reach the point you made the move/copy mistake. Paste the new detail. Thereby not work has been lost.
Offset by Half the Distance
This tip can be used in other places then offset, but for the purpose of an example the offset command is used. If offsetting around a centerline symmetrically, type at the offset distance prompt; 500/2. Click the centerline and click on a side to offset. The centerline will be offset 250.
Pick Two Points for Distances
For many commands, a distance is keyed in – the OFFSET command for example – However it is also possible to pick two points, to retrieve distances.
Repeat a Command
Any command can continuously repeat. The command to do this is MULTIPLE. MULTIPLE command works well with the FILLET and CHAMFER commands.
To repeat command:
- Type in MULTIPLE at the command line.
- Then at the “Enter command name to repeat” prompt, type in the command you want to be repeating.
- This command is now started and will continuously repeat until you press the ESC key.
From a macro, in a toolbutton or pull-down menu item, the * character does the same thing. Example: *^C^C_fillet.
Save, Edit, Restore System Variables
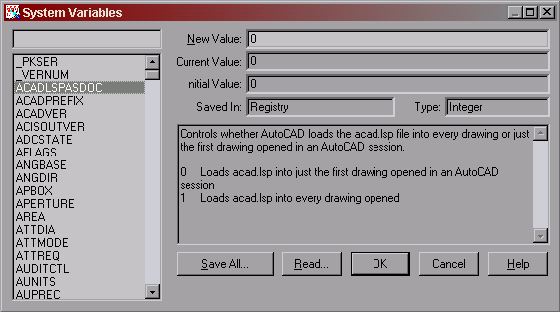
The command SYSVDLG can be used to view and modify system variables. You can save all your system variables to a *.svf file and then use it to restore your system variables to the preferred settings if you switch to a different workstation.

Text Under a Dimension Line
After placing a dimension, use Mtext editor and add this switch after the Dimension text \X (note it has to be a capital X) and type “TYPICAL”. Example text string will look like this <>\XTYPICAL. Observe the results.
Stretch with Grips
Multiple grips can be selected to stretch an object.
- Select objects so grips are displayed.
- Hold down SHIFT and select both end grips so they are highlighted.
- Release SHIFT and define the stretch displacement

Superscript / Subscript with the Stack Button
It is possible to get superscript (m²) in any font and any character type. Using mtext editor, type this text E=MC2^ followed by one blank space. Highlight the 2^ and the blank space. On the character tab press the stack button. It will then format the text to this E=MC²
“less than” or “greater than” symbol
A variation on this tip can create the less than and greater than symbols:
- <^_ + the stack button = less than symbol
- >^_ + the stack button = greater than symbol
Toggle OSNAPS with TAB Key
Toggle between OSNAPS by pressing the TAB key. Example: At a ‘T’ intersection there is a end point, an intersection and possibly a mid point. Users can toggle between the three types by press the TAB key.
Transparent Commands
You can use many commands transparently; that is, you can enter them on the command line while another command is active. To use a command transparently, enter an apostrophe (‘) before entering the command. After you complete the transparent command, the original command resumes. Example:
Command: L
LINE Specify first point: ‘p
>>Press ESC or ENTER to exit, or right-click to display shortcut menu.
Resuming LINE command.
Specify first point:
Use Shift Key to Remove
When AutoCAD has asked you to Select objects, you are in Add Mode, which means that the objects you select are being added to the selection set. If you hold the Shift key down, you are immediately in Remove Mode, which means that the selected objects will be removed from the selection set.
A non-dialog version of a command
(dash) Command line prefix – invokes a non-dialog version of a command. ie -LAYER