Written by MickD www.dcservices.net.au
In the last article we discussed basically what a Vector was and had a brief look at the difference between a Point and a Vector. This time we are going to look at what a Vector is made of and try to really get an understanding of why they are so useful as opposed to a Point. Again, not much math just trying to make the concept clear.
What’s in a Vector?
Let’s have another look at a point and a vector – p(6,8) and v(6,8). Both are 2 dimensional and have 6 units/steps/buses along the x axis and 8 units/steps/buses along the y axis (where units/steps/buses are the units of measure you may be using).
Practically the same as you can see but the way you should look and think about them is very different. As we said in the last article, Vectors have a direction and magnitude (or length) and this direction is probably the most useful part of a Vector. To explain this difference a bit further we are going to introduce a few more terms which will make things a bit clearer.
Scalars
Scalars can be thought of as the same as units but I like to think of them differently when it comes to Vectors. A unit (for our purposes) is an amount of measurement such as an inch, millimetre or foot that we use to to get to our point by saying something like – “walk 4 feet in the ‘x’ direction then 6 feet in the ‘y’ direction” to get to your point. With Vectors you multiply a ‘unit’ by a ‘scalar’ to get these distances where a scalar is a ‘real’ number and not a unit of measurement. It’s the same as saying “walk 4 x 1 foot in the ‘x’ direction…yada, yada”. This will become clearer after I explain ‘unit vectors’.
What’s a Unit Vector?
I’m glad you asked!
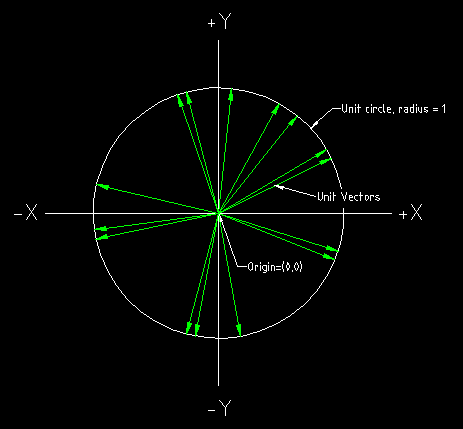
A unit Vector is a vector whose ‘length’ equals 1 (1 unit of measurement long) and can be in any direction. You can create a unit vector or a ‘normalised’ vector from any vector and is done quite often when all you need is a ‘direction’ and not the length. Have a look at the figure below, it shows a circle with a unit radius and random ‘unit’ vectors( notice these vectors are all equal to the radius of the circle).
 |
| Figure 1 – Showing unit Vectors inside a unit circle. |
Vector Direction
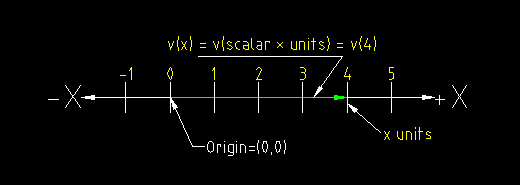
Now that we have briefly discussed scalars and unit vectors it will be easier to understand ‘direction’. Lets take a 1 dimensional vector, say the ‘x’ axis in 1d, to represent this vector we would write v(x) where x is scalar in the x direction. Since we can only have 1 direction in 1d space our unit vector would be simply v(1). Have a look at figure 2 below and I’ll try to put this all together, it’s a vector in 1d of the value v(4) where 4 is the scalar we use to multiply with our unit of measure.
 |
| Figure 2 – Showing the parts that make up a vector in 1 dimension |
Now let’s discuss how to use a similar vector in a 2d or 3d environment. In 2d we have another axis we usually call ‘y’ which is perpendicular to ‘x’ and in 3d we also have the ‘z’ axis which is perpendicular to the plane created by the x and y axes. ‘Nothing new here’ you might say but now we have a new way to look at these axes, they have ‘direction’.
In 2d and 3d we have what we usually call the ‘origin’ which is represented by vectors as v(0,0) and v(0,0,0) respectively, these are called, wait for it…’zero vectors’ which means ‘no direction’ or ‘no quantity’. The 2d origin is made of two 1d zero vectors, 3d of three zero vectors, one for each axis (remember this!).
Now this is where scalars and direction come in, as you know, if you multiply a scalar by a unit it will give you a new amount but if the unit = 0 then our result will be 0. This is no good, we need a way to always have a result and ‘unit vectors’ are what we need.
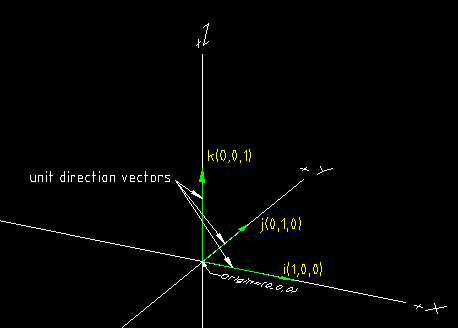
The way to use unit vectors in a 1,2 or 3d to help us here is to create a unit vector along each axis, we will call them i, j and k for the x, y and z axes respectively, see below –
 |
| Figure 3 – Showing unit vectors along each axis |
As you can see, we now have a ‘direction’ along each axis which we can multiply by a scalar to give us a vector to any given point, pretty cool eh!
Let’s have a closer look at these vectors and what their values are –
i ( 1 , 0 , 0 ) – where x = 1 , y = 0 , and so on….
j ( 0 , 1 , 0 )
k ( 0 , 0 , 1 )
Look familiar?, this is also how you would write an ‘Identity Matrix’, but we won’t go there just yet, maybe next round of articles but all you need to know is that vectors and matrices go hand in hand and you can’t really understand matrices without understanding the Vector 😉
Just a bit of Math!
We have to introduce a little simple math to fully absorb what a vector is made of, pretty simple stuff but very powerful and a base for all your vector calculations in the future.
Lets take a 2d point p(3,5), remember that a point is just a location relevant to our given space, say ‘world’ space in our CAD package, this point has 2 scalars, 3 and 5, that we will use to create our vector to this point. To create our vector we have to multiply our axis direction vectors (i and j for 2d) by these scalars, here’s the math –
i = 1 , 0
j = 0 , 1
p(x) = 3
p(y) = 5
Our new vector will be ‘v’ –
v(x,y) = v(x) = i(x)*p(x) + i(y)*p(x)
v(y) = j(x)*p(y) + j(y)*p(y)
filling in for what we know, we have –
v(x) = (1 * 3) + (0 * 3) = 3
v(y) = (0 * 5) + (1 * 5) = 5
(notice that our ‘y’ part in our x direction vector is really just a 1d ‘zero vector’ giving us ‘no direction’ for the ‘y’ part, similar with the ‘x’ part in the y direction vector!)
v(x,y) = v(3,5)
Exactly the same as the point but a completely new way to look at it don’t you think? You could also think of this vector as being made up of 2 1d ‘direction vectors’ of given lengths put together to give us an overall direction in space.
From here we can ‘normalise’ this vector to give us our direction which we could multiply by a scalar to move our graphical objects about in space. An example would be to move some objects a certain distance one way, say a car, and another object, say a bike a certain distance in the opposite direction (by ‘negating’ the same vector or multiply it by a negative scalar!).
This is still all very simple but I hope you now have a better understanding of what a vector is made of, next time we will get into a bit more math and see how we can use them to do some graphical gymnastics with your drawings.
If you found this article helpful, let me know by leaving a comment below, your feed back is encouraging and gratefully accepted. Thanks to all who posted a comment for the last article, many of you already know this stuff and it’s good to know you think it’s ok, if you want to leave a suggestion or comment regarding the ‘correctness’ of any of the content, please do, I’m still pretty new to this too!
Cheers ’till next time,
MickD.